Category Archives: MP-5900

6.7.4 Unlock Combination Setting

6.7.4 Unlock Combination Setting
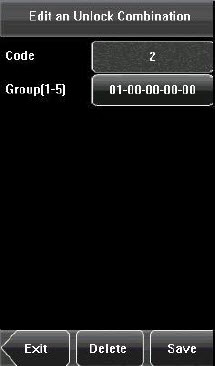
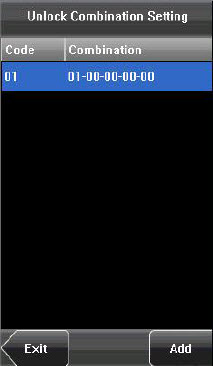
Make various groups into different access controls to achieve multiverification and improve security. An access control can be made up of 5 groups at most.

1. Add Unlock Combination
5-23-2014 9-31-12 AM(1)
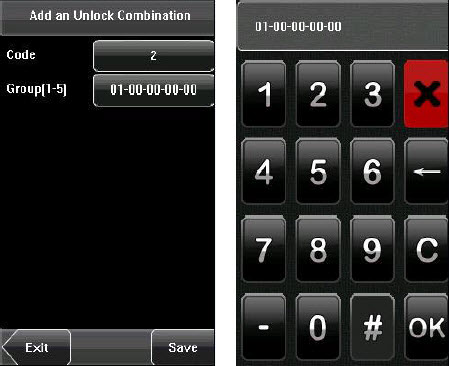
Enter holiday add Combination Setting interface, press the key to edit the items.
(2) Press the touch screen number key to set the value, after setting, press [OK] to save, and press [X] for exit and return to the previous interface.
(3) Press [Save] to save the current information and return to the previous interface; press [Exit] directly to return to the previous interface without saving the current information.
5-23-2014 9-31-53 AM 2. Edit Unlock Combination

5-23-2014 9-32-56 AMSelect the line to be edited. Press the item directly to enter the edit interface. After editing, press [Save] to save the current information and return to the previous interface; press [Exit] directly to return to the previous interface without saving the current information.

3. Delete Unlock Combination
5-23-2014 9-33-27 AM
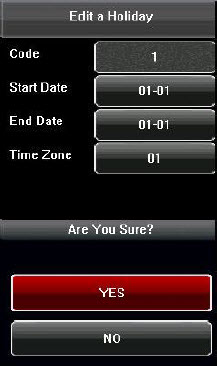
Select the line to be deleted. Press [Delete] to popup the confirm interface as follows. Select [Yes] to delete this holiday, otherwise select [No] to cancel the operation

ย้อนกลับ กลับสู่เมนูหลัก ถัดไป

6.7.6 Duress Alarm Parameters 

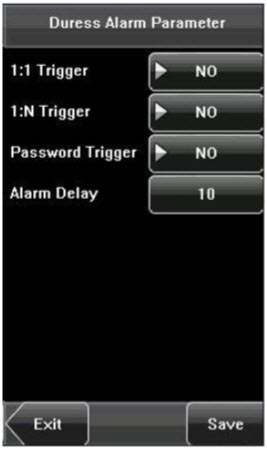
There are duress  alarm parameters setting in  the device. When an employee comes across a duress situation, he can use the set duress alarm mode to verify. The device will open the door as usual, but the alarm signal will be sent to the alarm.

2014-05-23 9-40-50
1:  1  Trigger: if  select  “Yes”,  when  user  use  1: 1 match mode, alarm signal will come out. Or there is no alarm signal.
1: N Trigger: if select “Yes”, when user use 1: N match mode, alarm signal will come out. Or there is no alarm signal.
Password Trigger: If select “Yes”, when a user use password verification mode, alarm signal will come out. Or there is no alarm signal.
Alarm Delay: After duress alarm gets started, the alarm signal will not output directly. It can be defined. After the set time period, the alarm signal will be generated automatically (0­255 seconds).

ย้อนกลับ กลับสู่เมนูหลัก ถัดไป

7. Data Management 

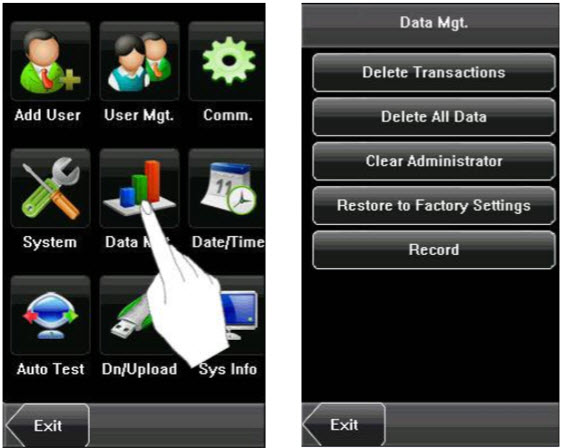
Through  the  [Data  Mgt.] menu,  you  can  perform management  of  data stored on the device, for example,  delete  the attendance  records, delete  all  data,  clear administrator, restore the device to factory settings, and query user records.

2014-05-23 10-19-00

1. Delete Transactions: Delete all the attendance records.
2. Delete All Data: Delete all the information of enrolled personnel, including their fingerprints, face images and attendance records.
3. Clear Administrator: Change all administrators to ordinary users.
4. Restore to Factory Settings: Restore all parameters on the device to factory settings.

5-22-2014 5-26-22 PMNotice: The employee information and attendance records will not be deleted during restoration to factory settings.

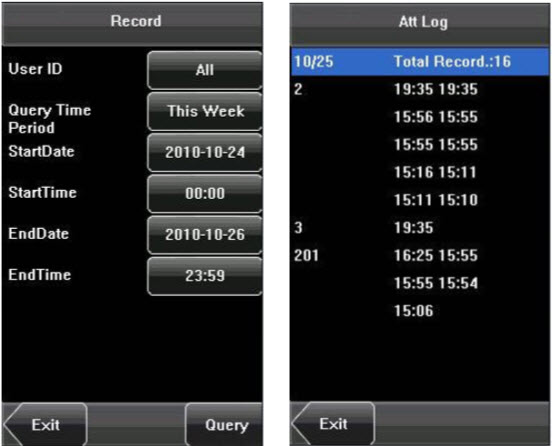
5. Query  Record:  After  check­in  successfully,  the  employee’s  attendance records  are  saved  in  the  device.  You  can  easily  query  these  attendance records.
User ID: Enter the user ID of the employee to query. If this field is left blank, you can query the attendance records of all the employees. If you enter a user ID, you can query the attendance records of this employee.

Query Time Period: Select a time period to query, including the customized time period, yesterday, this week, last week, this month, last month, and all time periods.
Start and End: When you select a customized time period, you need to input a start time and an end time. When you select other options for the time period, the start and end time will be automatically adjusted to the related time.
After setting the query conditions, press [Query] and the records that meet the specified query conditions will be displayed on screen. Select  the  row  where  the  desired  record  is  located,  you  can  query  the detailed information of this record.

2014-05-23 10-17-56

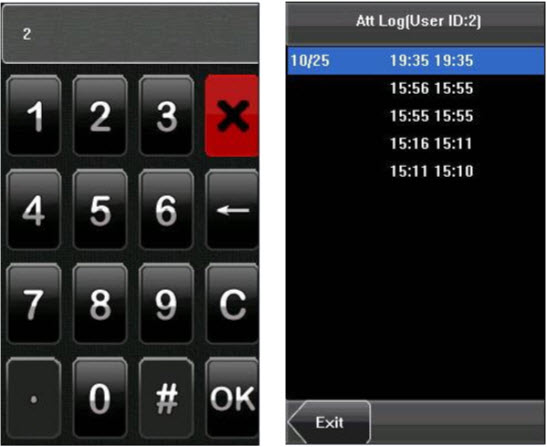
For example, press User ID and enter the edit interface, input the ID number and press [Query], the query result will display as below.

2014-05-23 10-17-08


ย้อนกลับ กลับสู่เมนูหลัก ถัดไป

6.7.3 Group time zone setting 

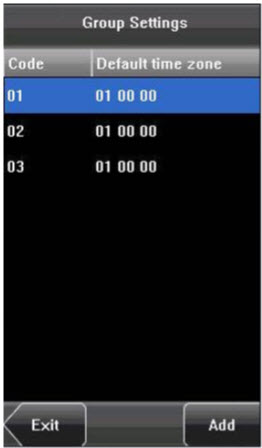
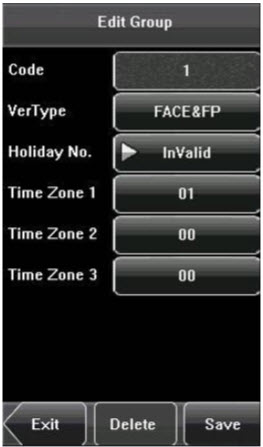
Grouping  is  to  manage  employees  in  groups. Employees in group use group time zone by default. Group members can also set user time zone. Every group can hold three time zones. The new enrolled user belongs to Group 1 by default and can also be allocated to other groups.

2014-05-23 9-13-17

1. Add group time zone
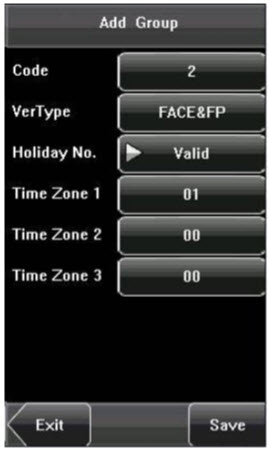
(1) Enter the Add Group interface; press the key to edit the items.
Code:  Enter  the  number  edit  interface  to  set  the value.
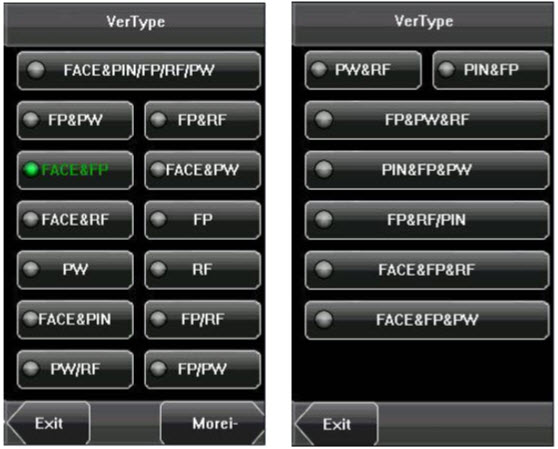
VerType: Select the Group Verify Type.
Holiday  No.:  Select  if  the  Time  zone  is  valid  in holiday.
Time Zone: Select the Group Time Zone.
(2) After  editing, press  [Save] to  save the current information  and  return  to  the  previous  interface; press  [Exit]  directly  to  return  to  the  previous  interface  without  saving  the current information.

2014-05-23 9-13-59

5-22-2014 1-25-17 PM Note:
(1) RF means ID card verification. Only the products with the built­in ID cardmodule support the ID card verification.
(2)  For  Multi­combination  verification,  please  refer  to  Appendix  4 Multi­combination Authentication Mode. 

2014-05-23 9-14-23

5-22-2014 1-25-17 PM Notice:
1. If the holiday is valid, only when there is an intersection between group zone and holiday time zone, can the group member open the door.
2. If the holiday is invalid, the access control time of group member won’t be affected by holiday.

2. Edit group time zone
Press  the  line  to  be  edited,  and  enter  the  edit interface.  After  editing,  press  [Save]  to  save  the current  information  and  return  to  the  previous interface;  press  [Exit]  directly  to  return  to  the previous  interface  without  saving  the  current information.

2014-05-23 9-14-42

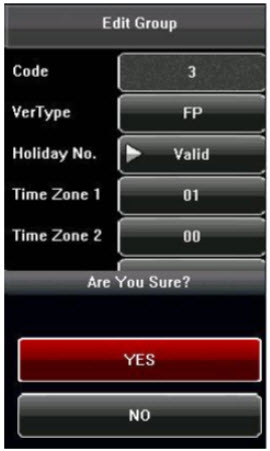
3. Delete group time zone
Select  the  line  to  be  deleted.  Press  [Delete]  to popup the confirm interface as follows. Select [Yes] to  delete  this  holiday,  otherwise  select  [No]  to cancel the operation.

2014-05-23 9-15-02


ย้อนกลับ กลับสู่เมนูหลัก ถัดไป

6.7.2 Holiday setting

6.7.2 Holiday setting
5-23-2014 9-05-03 AM
Special access control time may be needed during holidays. It is different to modify everybody’s access control time. So a holiday access control time can be set, which is applicable for all employees.

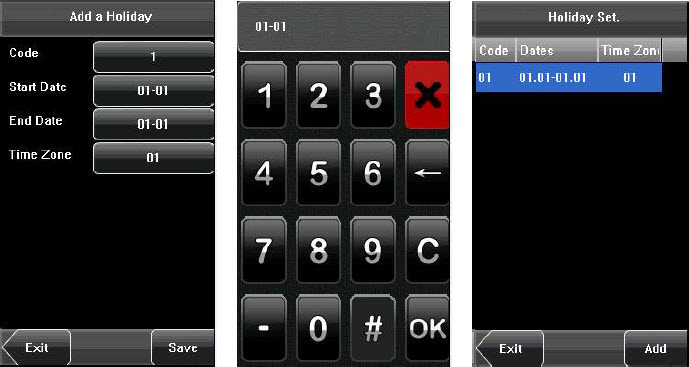
1. Add holiday:

5-23-2014 9-06-12 AM(1) Enter holiday add interface, press the key to edit the items.
(2) Press the touch screen number key to set the value, after setting, press [OK] to save, and press [X] for exit and return to the previous interface.
(3) Press [Save] to save the current information and return to the previous interface; press [Exit] directly to return to the previous interface without saving the current information.

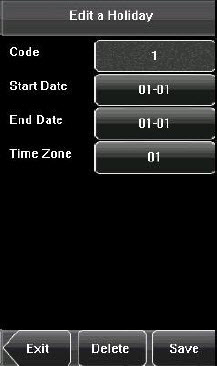
2. Edit holiday
5-23-2014 9-06-58 AM
 Select the holiday to be edited and enter the edit interface. The edit operation is similar to add holiday. After editing, press [Save] to save and return to the previous interface.
5-22-2014 5-26-22 PMNotice: If holiday access control time is set, user’s open door time zone during holiday is subject to the time zone here.

 3. Delete holiday
5-23-2014 9-07-17 AM
Select the holiday to be deleted. Press [Delete] to popup the confirm interface as follows. Select [Yes] to delete this holiday, otherwise select [No] to cancel the operation.

ย้อนกลับ กลับสู่เมนูหลัก ถัดไป

6.4 Face Parameters

6.4 Face Parameters

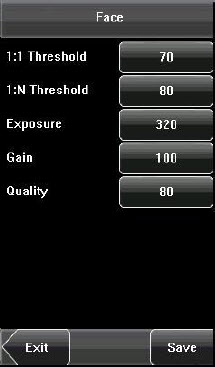
5-22-2014 5-10-40 PM 1: 1 Threshold: This parameter is used to set the threshold of matching between the current face and the face template enrolled in the device in the 1:1 verification mode. If the similarity between the current face and the face template enrolled in the device is larger than this threshold, the matching is successful; otherwise, the matching is not successful. The valid value scope is 55─120. The higher the threshold, the lower the FAR and the higher the FRR are, and vice versa.
1:1: N Threshold: This parameter is used to set the threshold of matching between the current face and the face template enrolled in the device in the 1: N verification mode. If the similarity between the current face and the face template enrolled in the device is larger than this threshold, the matching is successful; otherwise, the matching is not successful. The valid value scope is 65─120. The higher the threshold, the lower the FAR and the higher the FRR are, and vice versa.

The recommended thresholds are as follows:
5-22-2014 5-11-16 PM Exposure:
This parameter is used to set the exposure value of the camera.
Gain: This parameter is used to set the gain value of the camera.
Quality: This parameter is used to set a quality threshold for the face images obtained. The device accepts the face images and processes them by adopting the face algorithm when their quality is higher than the threshold; otherwise, it filters these face images.

5-22-2014 1-25-17 PMNote: Improper adjustment of the Exposure, Gain and Quality parameters may severely affect the performance of the device. Please adjust the Exposure parameter only under the guidance of the aftersales service personnel from our company.

ย้อนกลับ กลับสู่เมนูหลัก ถัดไป

6.7.1 Time zone setting 

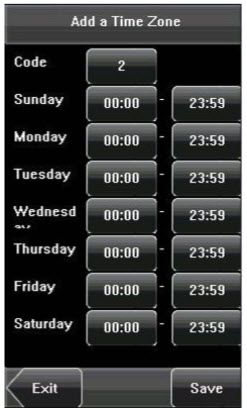
Time  zone  is  the  minimum  unit  of  access  control option. The whole system can define 50 time zones. Every  time  zone  consists  of  seven  time  sections (that  is,  one  week).  Every  time  section  is  the effective time zone within 24 hours every day. Every user  can  set  3  time  zones.  It’s  “or”  between  the three zones. It is effective if only one is satisfied. Every  time  section  format  is  HH:MM­HH:MM, namely, accurate to minute. If end time is smaller than start time (23:57­ 23:56), the whole day is forbidden. If end time is bigger than start time (00:00­ 23:59), it is effective section. Effective time zone for user unlocking: 00:00­23:59 or end time is bigger than start time.

2014-05-22 17-24-25

Notice: System default time zone 1 as whole day open (namely, the new enrolled user is unlocking).

ย้อนกลับ กลับสู่เมนูหลัก ถัดไป

6.7 Access Settings 

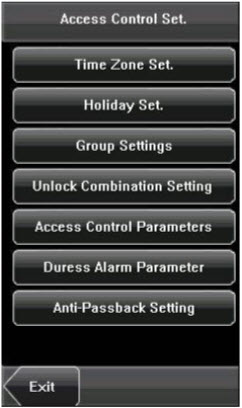
Access control settings are to set user’s open door time  zone,  control  lock  and  set  related  device parameters. To unlock, the enrolled user must accord with the following conditions:

2014-05-22 17-20-08
1. The current unlock time should be in the effective time of the user time zone or group zone.
2. The group where the user is must be in access control  (or  in  the  same  access  control  with  other group, to open the door together).
The new enrolled user is under the first group by default, and use the No. 1 group time zone, the No. 1 access control group. The new enrolled user is in unlocking state (if you have modified the related settings of access control, the system will be changed with the modification).

ย้อนกลับ กลับสู่เมนูหลัก ถัดไป

6.6 Keyboard Definitions 

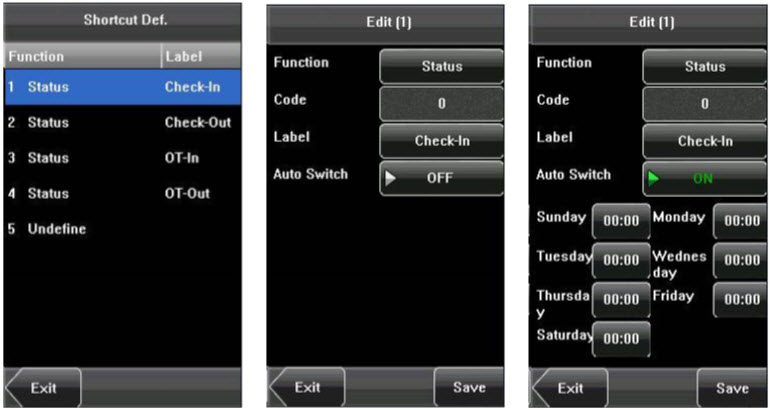
Define touch screen functional shortcut keys.
1. Press [Shortcut Def] to display the [Edit] interface, as shown below.

6.6

2. If you  want to  cancel the  shortcut  key,  press  [Status] to  enter the  edit interface, select the value to “Undefined”.
3. Edit the item [Code], select [Label] (Six attendance state option). Select the state of [Auto Switch], the interface as shown above.
4. Press [Save] to save the modification and exit.

ย้อนกลับ กลับสู่เมนูหลัก ถัดไป

6.5 Log Settings 

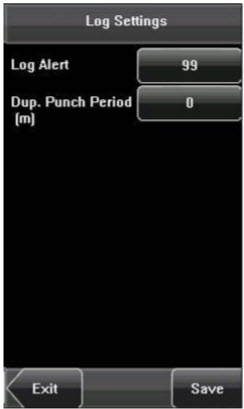
Log Alert: When the available space is insufficient to store the specified number of attendance records, the  device  will  automatically  generate  an  alarm (Value scope: 1­99). Dup.  Punch  Period  (m):  If  a  user’s  attendance record already exists and the user punches in again within the specified period (unit: minute), the second attendance record will not be stored (Value scope: 1­60 minutes).

6.5


ย้อนกลับ กลับสู่เมนูหลัก ถัดไป