Category Archives: Product

4.1 Edit a User 

Press a user name from the list to enter the [User Info] interface. The User ID cannot be modified, and the other operations are similar to those performed in add a user. You can re­enroll your fingerprint and face image, change your password, modify the management rights and group number.
For example: Change the user rights from Administrator to ordinary user. As shown below.

2014-05-22 16-00-52


ย้อนกลับ กลับสู่เมนูหลัก ถัดไป

3.10 Enrolling an ID card ★

3.10 Enrolling an ID card ★
5-22-2014 3-46-15 PM1.
Press [Card] on the [Add User] interface to display the [Enroll Card] interface.
2. The [Punch Card!] interface pops up as shown below. Swipe your ID card properly in the swiping area. For details, see 1.6 Appearance of the Device.
3. If the card passes the verification, the device will display a prompt message “Read Successfully! Card No.: **********”, and returns to the [Add User] interface.
4. Press [Save] to save the current information and return to the previous interface. Press [Exit] to return to the previous interface without saving the current information.
5-22-2014 3-46-50 PM


ย้อนกลับ กลับสู่เมนูหลัก ถัดไป

3.9 User Access Settings 

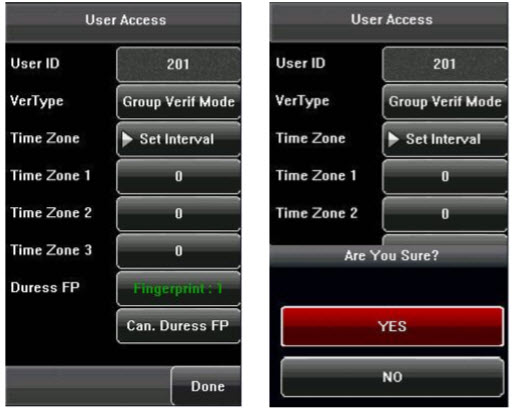
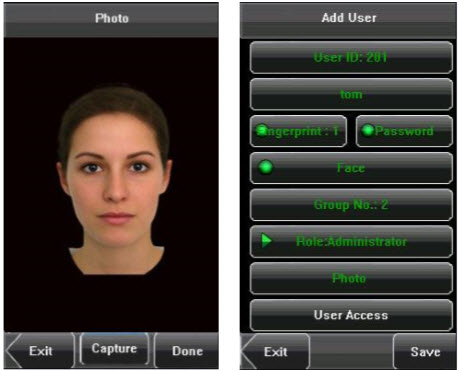
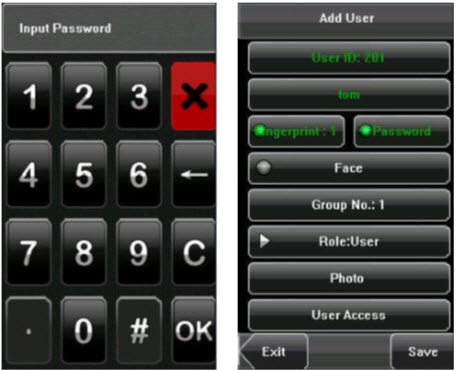
Press [User Access] on the [Add User] interface to display the user access settings interface. User Access settings are to set the user’s rights to verify and open the door, such as the Verify Type, Time Zone and Duress FP management.
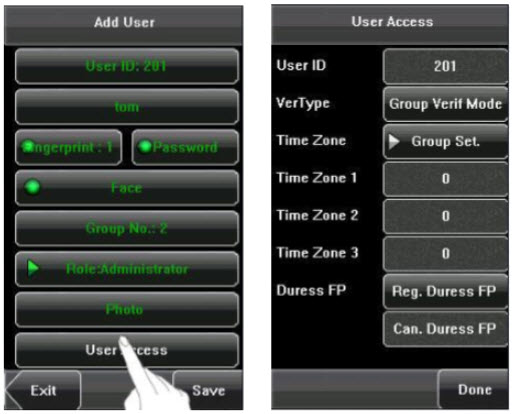
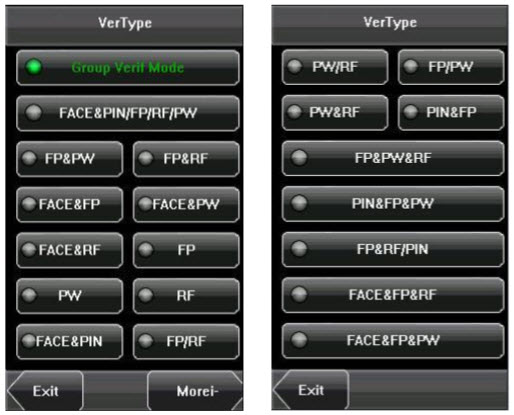
2014-05-22 15-52-22

1. Verify Type:
(1) Group Verify Mode: If the user uses the group verify mode that he belong to.
(2) Individual verify mode: Select the verification mode for this user instead of the group verify mode. That will not affect other users in this group.

 Note:
(1) Only the products with the built­in ID card module support the ID card verification.
(2)  For  the  verify  type,  please  refer  to  Appendix  4  Multi­combination Authentication Mode. Only some types of devices support Multi­combination authentication mode.

2014-05-22 15-52-01

2. Time Zone:
(1) Group Time Zone: If the user uses the group time zone that he belong to.
(2) Individual time zone: Select the time zone of this user instead of the group time zone. That will not affect other users in the group.
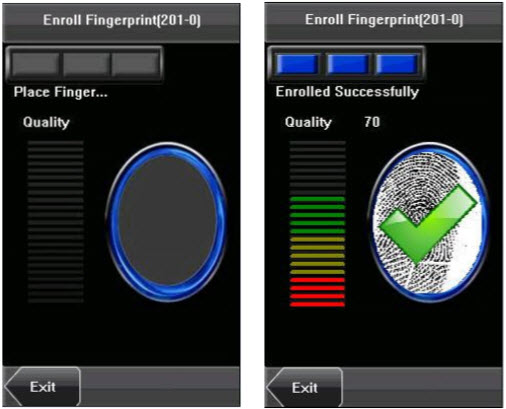
3. Duress FP:
Enroll a new duress fingerprint or cancel an existing one.  In  any  situation,  only  if  the  enrolled  duress fingerprint is verified, it will trigger the duress alarm.

2014-05-22 15-51-42
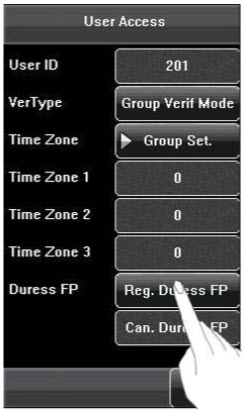
Duress FP management:
(1) Register Duress FP:
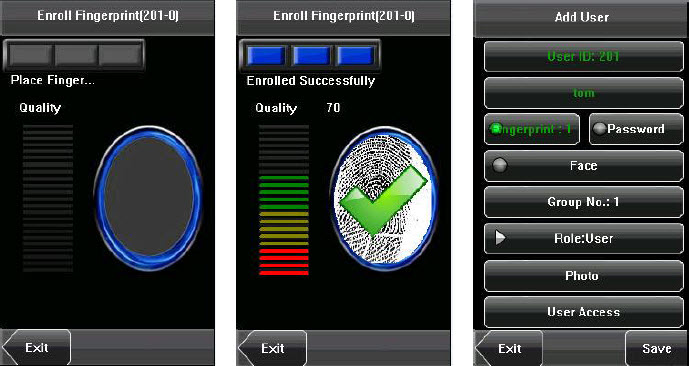
Press  [Reg.  Duress  FP]  on  the  [User  Access] interface to display the [Enroll Fingerprint] interface. On the displayed [Enroll Fingerprint] interface, place your  finger  on  the  fingerprint  sensor  properly according to the system prompt. For details, see 1.3 Finger Placement.

2014-05-22 15-51-20

(2) Cancel duress FP:
Press [Can. Duress FP] on the [User Access] interface to popup the confirm message.  Select [YES] to  delete the  enrolled duress  FP,  otherwise select [NO] to cancel the operation.

2014-05-22 15-50-37


ย้อนกลับ กลับสู่เมนูหลัก ถัดไป

3.7 Modifying User Rights

3.7 Modifying User Rights

5-22-2014 1-25-17 PMNote: There are two types of rights respectively granted to two types of users: the ordinary users and administrators. Ordinary users are only granted the rights of face, fingerprint, or password verification, while administrators are granted the access to the main menu for various operations apart from having all the privileges granted to ordinary users.
1. On the [Add User] interface, press [Role: User] to change the user to an administrator.
2. After the modification is done, the interface is as shown below. Press [Save] to save the current information and return to the previous interface; press [Exit] to return to the previous interface without saving the current information.
5-22-2014 3-29-18 PM


ย้อนกลับ กลับสู่เมนูหลัก ถัดไป

3.8 Enroll Photos 

If  you  had enrolled  your  photo in the  system,  the system will display your enrolled photo in addition to your ID and name after you pass the verification.

2014-05-22 15-38-33
1.  Press  [Photo]  on  the  [Add  User]  interface  to display the photo enrollment interface. 2. On the photo enrollment interface, stand naturally in front of the screen. For details, see 1.1 Standing Position,  Posture  and  Face  Expression.  Press [Capture] to capture the photo.
3. After taking the photo, press [Exit] to return to the previous interface.
4. After the photo is taken, press [Save] to save the current information and return to the previous interface; press [Exit] to return to the previous interface without saving the current information.

2014-05-22 15-39-17


ย้อนกลับ กลับสู่เมนูหลัก ถัดไป

3.6 Entering a Group No. 

During  face  enrollment,  the  device  automatically allocates a group No. starting from 1 for every user in sequence. When the number of users in Group No. 1 reaches the upper limit, the subsequent users will under Group No. 2 automatically. Up to 100 face images can be enrolled in Group No. 1 and only 50 face images can be enrolled in other groups. If you use the group No. allocated by the device, you may skip this section.

2014-05-22 15-32-20
1. Press [Group No.] on the [Add User] interface to display the group No. management interface.
2. On the displayed keyboard interface, enter your group No. and press [OK].
3. After the group No. is entered, an interface is displayed as shown below. Press  [Save]  to  save  the  current  information  and  return  to  the  previous interface. Press [Exit] to return to the previous interface without saving the current information.

Tip: A valid group No. contains 1 to 24 digits. Please remember your own group No.

2014-05-22 15-30-15


ย้อนกลับ กลับสู่เมนูหลัก ถัดไป

3. 3 Enrolling a Fingerprint

3. 3 Enrolling a Fingerprint
5-22-2014 3-03-15 PM 1.
Press [Fingerprint] on the [Add User] interface to display the [Enroll Fingerprint] interface.
2. On the displayed [Enroll Fingerprint] interface, place your finger on the fingerprint sensor properly according to the system prompt. For details, see 1.3 Finger Placement.
3. Place the same finger on the fingerprint sensor for three consecutive times correctly. If the enrollment succeeds, the system will display a prompt message and automatically return to the [Add User] interface. If the enrollment fails, the system will display a prompt message and return to the [Enroll Fingerprint] interface. In this case, you need to repeat the operations of step 2.
4. You can enroll the backup fingerprint by pressing [Fingerprint] again. A user can enroll 10 fingerprints at maximum.
5. Press [Save] to save the current information and return to the previous interface. Press [Exit] to return to the previous interface without saving the current information.
5-22-2014 3-03-55 PM


ย้อนกลับ กลับสู่เมนูหลัก ถัดไป

3. 5 Enrolling a Face 

1.  Press  [Face]  on  the  [Add  User]  interface  to display the face enrollment interface.
2. On the displayed face enrollment interface, turn your  head  to  the  left  and  right  slightly,  raise  and lower your head according to the voice prompts, so as  to  enroll  different  parts  of  your  face  into  the system to assure the accurate verification. See
1.2 Enrollment Face Expressions.

2014-05-22 15-17-57
3. If  your face image is  enrolled  successfully,  the system  will  display  a  prompt  message  and automatically return to the [Add User] interface.
4. Press [Save] to save the current information and return to the previous interface. Press [Exit] to return to the previous interface without saving the current information.

2014-05-22 15-19-04


ย้อนกลับ กลับสู่เมนูหลัก ถัดไป

3. 4 Enrolling a Password 

1. Press [Password] on the [Add User] interface to display the password management interface.
2.  On  the  displayed  keyboard  interface,  enter  a password and press [OK]. Re­enter the password according  to  the  system  prompt  and  then  press [OK].

2014-05-22 15-05-42

Tip:  The  device  supports  1­8  digit passwords by default. 

3.  After  the  password  is  entered,  an  interface  is displayed as shown below. Press [Save] to save the current information and return to the previous interface. Press [Exit] to return to the previous interface without saving the current information.

2014-05-22 15-06-38


ย้อนกลับ กลับสู่เมนูหลัก ถัดไป

3.2 Entering a Name 

Use  T9  input  method  to  enter  the  user  name through the keyboard.

2014-05-22 14-59-16
1.  Press  [Name]  on  the  [Add  User]  interface  to display the name input interface.
2.On the displayed keyboard interface, enter a user name and press [X]. For details of operations on the keyboard interface, see Appendix 1 T9 Input Instructions. 
3. After the user name is entered, press [Save] to save  the  current  information  and  return  to  the previous  interface.  Press  [Exit]  to  return  to  the  previous  interface  without saving the current information.

2014-05-22 14-59-47

Tip: The device supports the 1 to 12 characters names by default.

ย้อนกลับ กลับสู่เมนูหลัก ถัดไป